Monday, November 19, 2012

Thankful

always be thankful It's that time of year again!! There is nothing like seasonal decor, spending time with family and friends, enjoying delicious food and reflecting on all that you have been blessed with. It is only the beginning of the season and I am already feeling the pressure to rush through to get it all done and have no motivation. My goal for this season is to take it slow and take in each precious second. It is our daughter's first Thanksgiving and Christmas and I want everything to be perfect. Ha, like that is going to happen. I just need to keep reminding myself that I will cherish the look on her face and her reactions to all of the new things to come much more than how "perfectly" our house was decorated.


To begin Thanksgiving we hosted our annual friends pot luck dinner. I love celebrating and catching up with everyone. We will certainly keep this tradition going for many years to come! Next on the agenda is our family Thanksgiving, Busch Gardens Christmas Town, Christmas parties, Washington D.C. Zoo or Museum, Shopping and more Celebrating!!

There have been several amazing things popping up on Pinterest that I feel compelled to share. Hopefully it will spark some holiday motivation!

Pumpkin Fluff Dip  Recipe
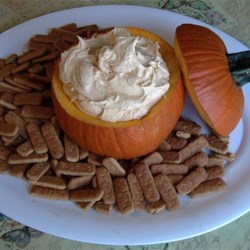
This is the best dip ever!! Super easy and a great  hit!


Fall Party Decor
  

Thankful Tree


Caramel apple dip and apples thanksgiving style.

Thanksgiving Craft Ideas

Tuesday, November 13, 2012

Happy Fall

 I am enjoying the final days of my flowers before the frost finally gets them for good. I am sad to see them fade away but am very excited to see them return bigger and better in the spring! Thanks to Chad's parents I have many new varieties of flowers to add to our yard!! Now, time to relax during this cold weather by enjoying a cup of pumpkin spice coffee and working on a few crochet projects. While doing so I will be dreaming about possible designs for new garden spaces!                                            

Check out the latest crochet projects by visiting Sundry Inspirations Facebook Page.


Sunday, November 11, 2012

Mickey Mouse Ear Flap Hat - Free Pattern (Crochet)

I had a request to make a Mickey Mouse hat and many requests for the pattern. Here it is! Enjoy!!


.
Hat (Toddler Size)
  The hat is worked in continuous rounds. You do not need to join with a sl st !
Ch 3, sl st to make a loop
Round 1- (working in the loop) hdc 10
Round 2- *dc 2 in each stitch (*repeat for a total of 20 stitches)
Round 3- *dc 1, dc 2 in next stitch (*repeat for a total of 30 stitches)
Round 4- *dc 1, dc 1, dc 2 in next stitch (*repeat for a total of 40 stitches)
Round 5- *dc1, dc1, dc1, dc2 in next stitch (*repeat for a total of 50 stitches)
Round 6-11 - dc around 50 stitches
Round 12- dc 47, sc 2, sl st 1 (continue to first ear flap)
1108121804b.jpg 
Earflap
  (First dc in same stitch as ch 2 for each turn)
Row 1- Ch 2, dc 9
Row 2- Ch 2 turn, dc 9
Row 3- Ch 2 turn, dc 2 tog, dc 5, dc 2 tog
Row 4- Ch 2 turn, dc 2 tog, dc 3, dc 2 tog, tie off
 
Repeat on opposite side so that there are 10 stitches between them across the back.

Edging
 Stitch  in ends attach red yarn in the back of the hat and work sc around the hat. Tie off and stitch in ends.

 Ears  *Make 4
Chain 3, sl st to make a loop, ch1
1108121924a.jpgRound 1- (working in the loop) hdc 10 in the loop, join to 1st hdc, chain 1
Round 2- *2 dc in each stitch (* repeat for a total of 20 stitches), join, chain 1
Round 3- *sc, 2 sc in next stitch (*repeat for a total of 30 stitches), join, fasten

--Leave a long enough tail to stitch ears together.
1111121335a.jpg*Sew two ears together with wrong sides facing each other. Sew onto the hat.

Braids
 Cut 9 strands of yarn, 14 inches long. Pull 3 strands through the center stitch above the trim and 3 through each side of that. Braid and tie off. Trim all ends to equal length. *Repeat on the opposite side. 

*Use this pattern as you wish. I do ask that you do not claim it as your own. Please link to my blog if you use it! Thanks!

Wednesday, November 7, 2012

Truth


Happiness is when what you think, what you say, and what you do are in harmony. - Gandhi


Saturday, November 3, 2012

Happy Halloween!

Luna's First Pumpkin
Again, I know I am late but had to share! In honor of Luna's first Halloween we had to decorate Grammy's house for all of the candy seekers. I then decided to make my own version of these trees I have been seeing on Pinterest lately. They will be converted to the Christmas version soon!

For my Halloween version I simply wrapped them in purple and orange lights and tied strips of black landscaping fabric to the cage. I suppose you could use ribbon, but I went for what I had on hand. Here they are!-- My pictures are taken from a cell phone so they aren't the best quality.

The purple tree is in the background.


Luna's Halloween Costume!

I know I am quite late on this, but better late than never! We have done so many things this fall. We made it to Carter Mountain for some apple picking, attended a beautiful wedding, made a trip to the beach, hosted a huge fall party and so much more! It has been quite eventful and beyond enjoyable.
   Since it was Luna's first Halloween I felt the need to create a very special costume. It is entirely crocheted (minus the white onesie). I do not have a pattern for most of it but used multiple patterns to create the hat, used a crocodile scale stitch worked in rounds for the leg warmers and just guessed on the poncho. Here is the pattern I used for those adorable shoes! I couldn't be happier with how it turned out. Our friend who is a fabulous photographer captured these great images. If you are in the area check her out!!
                                                                 http://www.facebook.com/pages/Megan-Quick-Photography/192873461396 

This isn't her costume but I had to share!!

Monday, September 3, 2012

Burlap Welcome Banner


Inline image 1


Inline image 1


I have a friend on Pinterest who always pins beautiful crafts made from burlap. I have always loved the look of this material and fell even more in love when I discovered how affordable it is! Taking a step into the fall decorating season (my favorite!) I decided to experiment with a simple welcome banner.


- I began by creating a simple template with an old cereal box from our recycle bin. Fold it in have to make it even on both sides!

-  Trace and cut out enough for your message. I did 7 for "Welcome".

- I used twine and my machine to attach each piece to create the banner.

- I wanted the letters to look neat so found a font I liked, typed what I wanted it to say (Welcome) and printed it to fit on my banner.

- I used the printed letters as a stencil under the burlap and painted over them with acrylic paint. I used tape to hold it in place while I traced over each letter.

- It looked great plain, but I love fabric flowers and decided to create two burlap flowers for the ends.  - There are several fabric flower tutorials out there. Here is one of my favorites.  Rolled Fabric Flower


Sunday, August 26, 2012

Busy, Busy, Busy


It has been a while since my last post and so much has happened since then! I have been helping loved ones, collecting donations for our local homeless, preparing the flower beds and vegetable garden for fall, and chasing Luna around! Life sure does change once your child becomes mobile! We have been taking little breaks from everything we have been working on to enjoy our new garden. It is so nice to have such a beautiful place to sit and enjoy our wonderful country views. Our Salvia and Russian Sage has been attracting so many tiny purple butterflies! You don't notice them until you walk by and cause them all to flutter around. I love the look on Luna's face when she notices them!

The plants that were added to the garden have rooted well and seem to be happy in their new home. Now I can watch it grow! We had some extra seeds and bulbs so I decided to create another small bed. We will have to wait until spring to enjoy it! Until then I am going to enjoy the taste of fall weather, perhaps even begin decorating for the upcoming season!!

Tuesday, August 14, 2012

Free Cycle Find


In my previous post you might have noticed the chair to the right of the garden. I love to re-purpose things and could not resist this fantastic (FREE) find!I found this chair on freecycle.org. If you have not heard of this site, check it out now! It is a place for people to list items they are seeking as well as items they are trying to get rid of. Type in your closest city and see what you can find!

When I placed it in our garden it didn't stand out enough, so I decided to paint it white. I used a paint that was a primer/ paint mix to get the best coverage possible with one step.

I really liked the color of the seat so covered it while I was painting. It was broken (which is why it was free) and my flower pot fits in there perfectly!


I love how it really stands out against the brick now! Another project complete, many more to go!!


Sunday, August 12, 2012

Bountiful Gifts


We have been busy spending time with our friends and family. Luna’s Grandma and Grandpa even came into town for a visit! Not only did they come to visit, they brought a truckload of plants from the Outer Banks, NC! I have planted a good amount in the front bed and have quite a few plants, bulbs and seeds left to work with. It is filling in very nicely and I will be picking up the final load of plants this week (For now!). I have many great plants that need a home, so therefore believe I will be creating another bed VERY soon! Now back to planting and enjoying our gorgeous fall like weather today!   

Plants added this weekend include: 


Wednesday, August 8, 2012

Truth

 When I go into the garden with a spade, and dig a bed, I feel such an exhilaration and health that I discover that I have been defrauding myself all this time in letting others do for me what I should have done with my own hands.   

- Ralph Waldo Emerson


Monday, August 6, 2012

Let There Be Mulch!


We have made so much progress this past weekend. I planted all of the plants I collected in their new homes while Chad cut the boards for the border and repaired our birdbath. (This job deserves its own post!)  Today I picked up a load of mulch and was able to unload it into two of our flower beds! I was hoping to get mulch for free but ended up paying $25 for a scoop. Before you get mulch, check with your counties dump to see if any is available free of charge. You may have to load it yourself but hey, it’s FREE! I know in our area Henrico County has two locations that offer mulch. Check before you buy!!  While mulching, I left some areas open because I will be going to pick up our final load of plants this week. I love plant swaps!


Friday, August 3, 2012

Cultivating Beauty


I have collected so many beautiful plants for our garden! I can’t thank those who have helped enough, especially my mother for keeping Luna company while I worked.  I did not fill all of our space so that we are able to add to it in the Spring. Until then, we still have a ton to do!

* The Camellia is in the orange oval. This will eventually reach 5-7' 
* The Gardenia is in the blue circle. This will eventually reach 3-4'


To Do:

 - Place the Border Boards
- Mulch
- Patio Pavers
-ART PROJECTS


Since our garden is mostly shaded throughout the day, I have had to search for shade tolerant plants. The plants in these areas include:
0802121947a.jpg
* There are also a few mystery plants. Once I figure it out I will share!


0802121947b.jpgThe front section of our garden gets a fair amount of sunlight and the plants in these areas include:


Here is my wish list to refer to in the Spring!
So far the only purchase I have made is the wood that will keep our garden from pouring out onto the sidewalk. That purchase was about $14. We are doing well! I have also made some fantastic finds and am so excited to upcycle them to fit into our garden! Pictures will be posted as soon as I get to those projects. Now, off to dig up a few more buckets of Iris!        

Thursday, August 2, 2012

Garden Inspiration

I have to admit that I have an addiction to Pinterest! (I am sure that I am not the only one!!) I can spend hours searching through posts and am always amazed at what I find. While browsing through the other night, I came across several inspiring posts and had to share. I can't wait to find the time to bring a new twist to some of these fantastic ideas! Let me know if you need an invite!

upcycled garden containers


Garden Design Small Spaces


Garden art


Pinned Image


Fairy garden inspiration


Wednesday, August 1, 2012

Helping Our Homeless


Hello! I have contacted a few organizations to find out which items are most needed in our area. I combined them into the list below and am hoping to collect whatever possible to help those in need. I would appreciate any help you are able and willing to give. Keep in mind that even the smallest donation can make a great difference! Thanks for reading and have a beautiful day! You can contact me at sundryinspirations@gmail.com 

Items needed:
  • Gloves/ Mittens
  • Scarves / *Yarn to make scarves
  • Hats
  • New Socks
  • Clothes, Used or New (Any condition appreciated!)
  • Coats
  • Personal Hygiene Items - Deodorant, Hair Brush, Comb, Toothbrush, Toothpaste, etc.
  • Backpacks/ Durable Bags
  • Non Perishable Snacks – Crackers, Trail Mix, etc.
  • Gift cards to Subway or McDonald's

Tuesday, July 31, 2012

Little Treasures


I have been busy collecting plants and other essential elements for our garden. Once I finally laid the baby down for a nap and made it outside to do some gardening, a summer storm decided to blow in!

I have been brainstorming ways to add special touches to our little oasis and came across an enormous tub of shells that I have been collecting over the years. I love sea shells but felt they needed more color to stand out so I decided to paint them!


- I selected a few white shells that had the same worn texture. I chose these because I knew they would absorb the paint very well. Be sure your shells are completely dry before you begin!

- I drew my designs onto the shells with a pencil before painting.

- I painted my shells with acrylic paint by applying thin coats and allowed each one to dry before adding another.

- After they were completely dry, I gave them two coats of sealer so they are weather resistant. I used a gloss sealer to make them shiny!


I am so happy with how they turned out. They have provided more inspiration for my bird bath! I have to wait until it dries out to begin that project!

Saturday, July 28, 2012

A New Journey


 “Many small people, in many small places, do many small things, that can alter the face of the world.”
- Anonymous


I have been reflecting on how insanely lucky I am to have a beautiful family, support from them and friends, a roof over my head and food on the table.  These reflections have taken my thoughts back to my time in college. I attended college in a small city and have seen numerous people who were homeless and have had some very enlightening and enjoyable conversations with them. Hearing some of their stories, you realize how quickly and easily you could find yourself in their situation. I remember seeing these people in the winter sleeping on cardboard or cold benches and doing everything they could to stay warm. I don’t have much to give but would like to do what I am able to make this winter more bearable. I have been brainstorming and this is what I have come up with.

Lately I have been saving all of our old worn and stained clothes for future projects, I hate throwing away things that can be repurposed. I have decided that the old sweaters can be turned into mittens and old t-shirts and blankets can be sewn into sleeping pads. Being really ambitious, I would also like to collect items such as backpacks, non perishable snacks, McDonalds or Subway gift cards, and personal care products.

To achieve this, I am gathering my friends to help. I won’t be able to reach as many people alone. After collecting more materials I will post instructions on making mittens and sleeping pads. I have never done it before but will find a way to make it work. Hopefully this journey will inspire others to lend a hand to those less fortunate.  If so, please share your stories!!


“Every day you have the opportunity to learn and experience some-thing and some-one new. Seize the opportunity. Learn and experience everything you can, and use it to change the world.”
- Rodney Williams

Wednesday, July 25, 2012

Developing Vision


I have been busy collecting plants and planning out our new garden space. My mother and I were able to score some beautiful Hostas and more Lariope, the grassy stuff (yes, I am crazy!). This time I will not be placing it directly into the ground. I am planting small clumps in pots and burying them in attempt to contain it. Only time will tell how well this serves its purpose! I will be sure to monitor its growth VERY closely.  This Sunday I will be going to dig up some gorgeous Iris to add to the collection. They are one of my favorites and I am so thankful to be getting them!

We need to replace the boards that ran along the edge to keep the gardens contents from spilling out onto the walkway. They will come this weekend as well. We are also looking to obtain a few landscape pavers to make a patio for our bistro set and walkways.

After removing all of the old plants, I spent several hours removing old boxwood and Yucca roots. I had to be careful in removing the Yuccas since a new one can sprout with a tiny piece of root! I know this will be a constant battle but I did my best. Once I was satisfied, I began leveling out the dirt and marking roughly where things are going to end up. (Notice the string and small sticks sticking out of the ground.) I also used a piece of grid paper to draw everything out for reference when I forget what I was originally thinking.

I placed a few plants and position our birdbath which was given to us by a family member.  I have special plans for it, you will have to wait to see!  I was sure to fill in underneath of it completely with rocks and clay to keep creatures from hiding.  

We still have a ways to go but are gradually getting there! I am thankful for everything that has been passed our way and excited to see it taking shape!

Monday, July 23, 2012

Awakening Notion

Your work is to discover your world and then with all your heart give yourself to it.                                                                 - Buddha

Sunday, July 22, 2012

Breaking Ground


When we first moved into our new house ( last October), I knew this project HAD to take top priority! After the arrival of our daughter I began breaking ground. What I thought would be a quick excavation has required much more work than expected!


We had a slight delay when we discovered two baby bunnies seeking refuge in the overgrown mass. Several frogs had to be relocated as well! 


When I began pulling grass out, I discovered a thick mass of roots entangled in landscaping fabric! It had to be cut out piece by piece. Once that task was complete Chad helped out with the removal of the old box woods. It took some serious man power and an axe. The muddy ground made it much easier, Amen for summer storms!


Chloe enjoyed helping out!
I am so excited about our new empty space.. now we can move to the fun stuff! Time for collecting plants and working them into our little oasis! 

Our goal is to spend as little money as possible on this project. We will be collecting plants from other areas of our yard and friends and creating our own garden treasures! I will keep you posted on this project!

A Glimmer of Inspiration

Man often becomes what he believes himself to be. If I keep on saying to myself that I cannot do a certain thing, it is possible that I may end by really becoming incapable of doing it. On the contrary, if I have the belief that I can do it, I shall surely acquire the capacity to do it even if I may not have it at the beginning.  
                                                                                     - Mahatma Gandhi